Microsoft authenticator adds an additional layer of security to your work or school account and permits a password-free sign-in to your Microsoft account. Here is a 2minutes guide to set up Microsoft Authenticator account.
The process to Setup Microsoft Authenticator
- First, launch a web browser and visit https://myaccount.microsoft.com/.
- Then log in to your work or school account with your username and password. Once your profile appears, click on the Security info tab located in the left side menu.
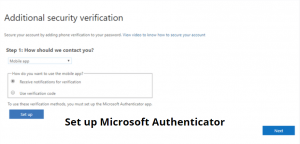
- Now, click on the add method tab and choose the authenticator app option from the list, and tap on the add button. This will take you to Start by getting the app page where you’ll be prompted to download the Microsoft authenticator app on your phone.
- So, open your phone and download the Microsoft authenticator app from the play store. Once the app is installed, allow the app to access your camera and record video, contacts, etc. Then you need to click on the add account tab. Then choose the work or school account and select sign-in with QR code option.
- Now come back on your PC, where Start by getting the app page is still open and click on the Next button.
- You will now land up at the Setup account page where you can get the QR code by clicking the next button.
- Just scan this QR code from your phone and tap the next button. If you aren’t able to scan the QR code, then you can manually enter the 9 digit code and URL link by tapping can’t scan the image link.
- Once the work or school account is added to your Microsoft authenticator app, you will receive a notification on the app on your phone. You just need to approve the notification and then your Microsoft authenticator setup is done.